Optimize your WordPress Database with WP-Optimize
If you’re using WordPress I’m sure you are also wondering how to optimize it to make to make your website lightning-quick.
There’s so many ways to optimize your website. Today I just want to discuss one of the most popular plugins used for optimization –WP-Optimize. Some of you might already have this installed on your website but for those who are unfamiliar with WP-Optimize, it’s a database clean-up and optimization plugin.
An optimize database is necessary because an unoptimized WordPress database can get full of clutter like unnecessary drafts, revisions, spam/unapproved comments, and track/pingbacks. This clutter can make it far more difficult for the server to retrieve the correct items from the database. This slows your website down significantly.
To clean-up your WordPress database, I’ll briefly show you how to use the WP-Optimize plugin to optimize your database and speed up your website.
Install WP-Optimize
Step 1: Login to your WordPress Administrator Dashboard using an administrator account.
Step 2: Click through to Plugins > Add New. From here, search for ‘WP-Optimize’.

Step 3: Once you see the WP-Optimized click Install Now > Activate Plugin.

Step 4: Now you’re done installing the plugin. With the plugin installed and activated, you can optimize your WordPress database in just a few clicks.
Using WP-Optimize
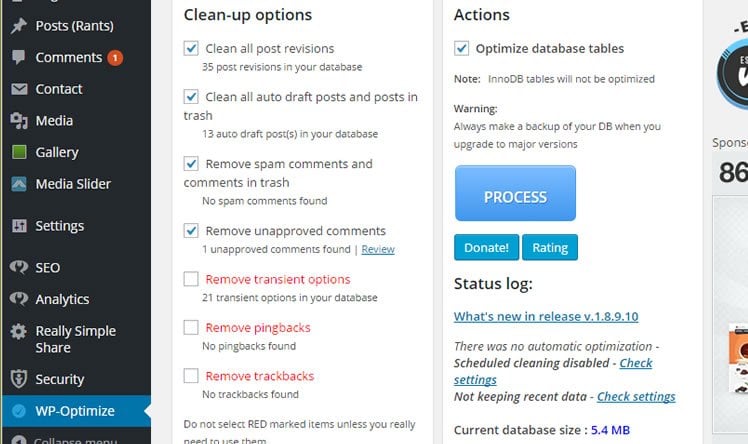
Start by navigating to the new WP-Optimize item added to the WordPress menu. You’ll be greeted by the Optimizer screen.

Here you can manually process a database clean-up. On the left-hand of the screen, you’ll be able to select which items WP-Optimize will target. This includes:
- Clean all post revisions – when your post is published, do you really need six post revisions clogging up your database?
- Clean all auto draft posts and posts in trash – you’ve deleted a post for a reason, so make sure all traces are removed from your database.
- Remove spam comments and comments in trash – spam comments are no good to anyone, so make sure they’re properly deleted.
- Remove unapproved comments – if you have hundreds of unapproved spam comments just sitting there, the plugin can delete them all in one go.
- Remove transient options – these are objects stored in your cache that can clutter up your database.
- Remove pingbacks
- Remove trackbacks
On the right side of the screen enable the “Optimize database tables” – make sure this box is checked.
You’ll also be given estimates of how much database space the plugin can save — for a more detailed breakdown, click on the Table tab at the top of the screen.
One all are set simply click the big blue “Process” button. After a few seconds the plugin will provide details of the actions performed, as well as notifying you that your database has been successfully optimized.
Automating WP-Optimize
You also have the option to automate WP-Optimize under the Settings tab. From here, you’ll be asked how long WordPress should keep your data. I recommend somewhere between 2 and 4 weeks – if you haven’t used a post revision by this point which probably you never will, so it’s just unnecessary database clutter.
You can also choose whether you want trackbacks/pingbacks and comments to be disabled. Once all are set, click “Save Settings”.

Auto-Clean-up Settings. This is controlled from the right side of the Settings screen as you can see on the above image.
Checked the “Enable scheduled clean-up and optimization” box, then specify how often you want to schedule an automatic clean-up. You can choose daily, weekly, fortnightly, and monthly. But it’s for better if you just set this to weekly but you have to option which schedule do you prefer.
You also have more items for auto clean-up targets like the before: post revisions, spam comments, transient options, trackbacks, and pingbacks. Just leave default checkmarks unless you prefer having it all enabled.
Once you are done, hit “Save Auto Clean-up Settings”.
Well, and that’s it – we’re set and all done! With the plugin now properly configured, you’ll never have to worry about de-cluttering your database again on your WordPress site.


